Modern AI coding tools like Claude Code and Copilot can write, test, and debug code autonomously. These tools are coding agents: software that takes a goal in plain language and executes the engineering steps needed to reach it. Left unconstrained, an agent will produce working code, but it may misunderstand requirements, skip tests, or make architectural decisions that conflict with the rest of the codebase.
A coding harness is the layer of structure that prevents this: a set of skills, automated checks, and conventions wired into the agent's workflow that encode best practices so quality is built in rather than bolted on afterwards. This is how I use one day to day.
This entire flow runs on his skills repo. I adopted it into my workflow, and it's been one of the biggest upgrades to how I ship code with Claude Code.
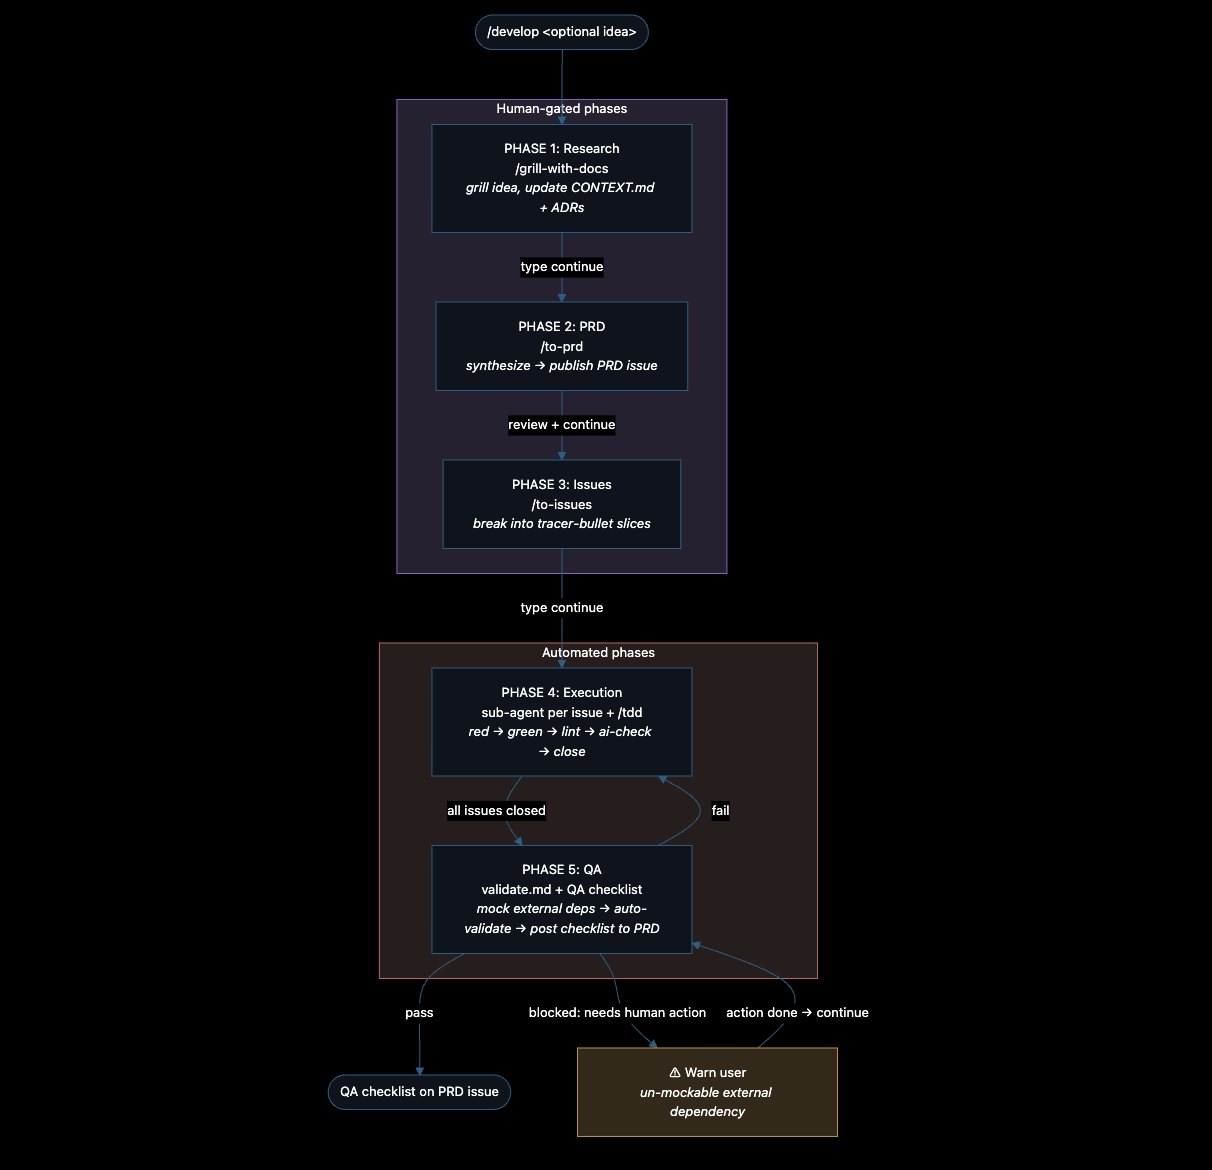
The /develop command is the main entry point: it drives a feature from rough idea to QA-ready implementation through five structured phases — Research → PRD → Issues → Execution → QA.
Why use it
- Forces clarity before code. The Research phase grills your idea against the domain model and documented decisions, so you don't start building on fuzzy assumptions.
- Creates a paper trail. Every feature produces a PRD and a set of issues on GitHub — searchable, reviewable, linkable.
- Keeps context windows small. Execution spawns a fresh sub-agent per issue, so the conversation never accumulates the whole feature's history. Long features don't degrade into context bloat.
- Test-first by construction. Each issue is implemented with TDD (red → green), where acceptance criteria become the behaviors under test.
- Built-in verification. Automated validation (endpoints, logs, traces, screenshots) runs before anything is called, and a human QA checklist lands on the PRD issue for final sign-off. External dependencies are mocked (tests reach the DB only); if something genuinely can't be automated, QA warns you instead of faking a pass.
- Human gates where they matter. You approve the PRD and the issue breakdown. After that, execution and QA run unattended.
Lifecycle
The workflow splits into two zones. The first three phases are human-gated: you drive the conversation, approve the output, and decide when to move forward. The last two phases are automated: the agent executes independently, looping until all issues are closed and validation passes. This split puts human judgment where it matters most and hands routine, mechanical work to the agent.
Each phase produces a concrete artifact — a sharpened domain model, a PRD issue, a set of GitHub issues, merged code, a QA checklist — so progress is always visible and traceable.
Phases
1. Research — /grill-with-docs
You bring an idea (optionally seeded via /develop add claims export). The command interviews you relentlessly, one question at a time, challenging the idea against the existing domain glossary (CONTEXT.md) and any ADRs. The codebase is explored to answer questions where possible. Terms get sharpened and documentation is updated inline.
Gate: type continue when grilling is done.
2. PRD — /to-prd
Everything learned in Research is synthesized into a Product Requirements Document (problem, solution, user stories, implementation + testing decisions, out-of-scope) and published as a GitHub issue. No re-interviewing — it works from context already gathered.
Gate: review the published PRD, then type continue.
3. Issues — /to-issues
The PRD is broken into tracer-bullet vertical slices — thin end-to-end paths through every layer (schema, API, UI, tests), each independently demoable. You're quizzed on the breakdown (granularity, dependencies, HITL vs AFK) and iterate until approved. Each slice is published as a GitHub issue labelled ready-for-agent.
Gate: type continue to begin execution.
4. Execution — sub-agent per issue + /tdd
Runs unattended. The command fetches all open ready-for-agent issues in dependency order.
For each, it spawns a fresh sub-agent that:
- Reads the /tdd skill.
- Treats each acceptance criterion as one TDD behavior (red → green, one at a time).
- Runs lint then a full check, iterating until clean.
- Reports back; the issue is closed on success.
Fresh sub-agents keep each issue's work isolated — no context bleed, no window bloat.
5. QA — validate.md + checklist
Runs unattended after all issues close. A validation sub-agent executes the full validate.md process — exercising endpoints, checking logs and traces, taking Playwright screenshots.
Tests reach the database only — every other external dependency (third-party APIs, blob storage, email/SMS, payment gateways, etc.) is mocked.
Three outcomes:
- Pass → a human QA checklist (happy paths, edge cases, responsive/permission/data-integrity checks) is posted as a comment on the PRD issue.
- Fail → work loops back to Execution to fix the offending issue, then QA re-runs.
- Blocked → if validation genuinely can't be automated because a live external dependency needs a human action that can't be mocked (manual credentials, a real third-party sandbox, an out-of-band approval), the agent doesn't fake a pass. It stops and warns you with the dependency and exactly what's needed. Complete the action, then tell it to continue and QA re-runs.
Usage
Once the skills are installed in your repository, development launches via:
# Start from scratch — grilling surfaces the idea
/develop

# Seed with an idea
/develop add a CSV export button to the claims table
Then follow the prompts: answer the grilling, approve the PRD, approve the issues, and let execution + QA run.
If you want to try this yourself, start with Matt Pocock's skills repo — it's the foundation this whole workflow is built on.